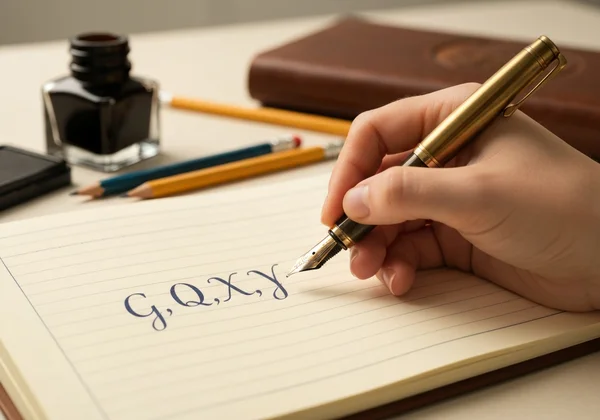
Mastering Tricky Lowercase Cursive Letters: G, Q, X, Y in the Cursive Alphabet
Feeling stuck on certain lowercase cursive letters? You're not alone! Many learners find that while letters like 'a' or 'c' come easily, a few tricky characters can disrupt their flow. Lowercase cursive 'g', 'q', 'x', and 'y' trip up many learners. Their loops, tails, and connections cause real frustration.
Have you ever wondered how to finally get these letters right? This guide is here to help. We'll break down each letter step-by-step, showing you exactly how to form them correctly. We’ll also cover common pitfalls to avoid and share essential practice tips to build your confidence.
Stick with me through this guide, and those pesky letters will soon flow right off your pen. For hands-on practice, you can find comprehensive worksheets and interactive tools for every letter of the alphabet on our resource hub.
How to Write Cursive 'G' with Ease: A Step-by-Step Guide
The lowercase cursive 'g' is an elegant letter that combines a familiar oval shape with a distinctive descending loop. Mastering it is key to writing words like "good," "give," and "again" smoothly. Let's break it down.
Deconstructing the Lowercase Cursive 'G' Strokes
Think of the cursive 'g' as two connected parts: the head and the loop.
-
Start with the Head: Begin just like you would for a cursive 'a' or 'o'. Start at the baseline, sweep up to the midline, curve back around to form an oval, and close it back at the starting point.
-
Create the Descending Loop: Once the oval is closed, don't lift your pen. Trace straight down from the right side of the oval, going well below the baseline.
-
Cross and Connect: At the bottom of the descent, create a smooth loop that swings to the left, crossing over the downward stroke at the baseline. Finish with an upward exit stroke, ready to connect to the next letter.
Common 'G' Mistakes and How to Fix Them
- Mistake 1: The Open Loop. The loop below the baseline isn't fully closed or crosses too high.
- Solution: Focus on making your downward stroke long enough before you begin the loop. Aim to cross the stroke directly on the baseline.
- Mistake 2: The Squashed Oval. The top part looks flat instead of like a proper circle or oval.
- Solution: Practice the 'o' and 'a' forms first to build muscle memory for that perfect, rounded shape.
- Mistake 3: Incorrect Size. The descending loop is either too large and clashes with letters on the line below, or too small and looks like a 'y'.
- Solution: Keep the descending loop the same height as the letter body.
Practice Tips for the Cursive 'G'
Consistency is everything. Dedicate a few minutes each day to practicing just the letter 'g'. Write it alone, then in simple words. For structured exercises, a worksheet is your best friend. You can find a dedicated free worksheet for the letter 'g' to guide your practice and build muscle memory.
Conquering Cursive Lowercase 'Q': Detailed Breakdown & Practice
The cursive 'q' is often confused with 'g' due to its similar structure. However, its tail sweeps in the opposite direction, giving it a unique and graceful finish. Mastering this letter is essential for words like "quick," "quiet," and "queen."
Understanding the Unique Strokes of Cursive 'Q'
Like the cursive 'g', the 'q' starts with a familiar shape.
-
Form the Oval: Begin exactly as you would for a cursive 'a' or 'g'. Start at the baseline, sweep up, and form a closed oval.
-
The Straight Descent: From the right side of the oval, draw a straight line directly down, going below the baseline. Unlike the 'g', this is not a curved descent.
-
The Forward-Sweeping Tail: Instead of looping to the left, the tail of the 'q' sweeps forward and to the right. Create a small checkmark or upward curve that does not cross the downward stroke. This forward motion is what prepares it to connect to the next letter.
Common 'Q' Difficulties and Solutions
The primary difficulty with the cursive 'q' is its tail. Many learners instinctively try to loop it backward like a 'g'.
- The 'G' Confusion: If your 'q' looks like a 'g', you're looping it in the wrong direction.
- Solution: Chant a simple reminder as you write: "'Q' goes forward." Focus on that final rightward flick.
- A Disconnected Look: The tail might look like a separate mark rather than a fluid part of the letter.
- Solution: Slow down. Ensure your pen doesn't stop after the downward stroke. It should be one continuous motion from the bottom of the descent into the upward tail.
Practice Tools for the Cursive 'Q'
To truly differentiate the 'q' from the 'g', you need repetition. Tracing and freehand practice are invaluable. Our platform provides downloadable practice sheets designed to help you master the unique forward motion of the cursive 'q'.
Mastering Cursive 'X' Practice for Fluid Penmanship
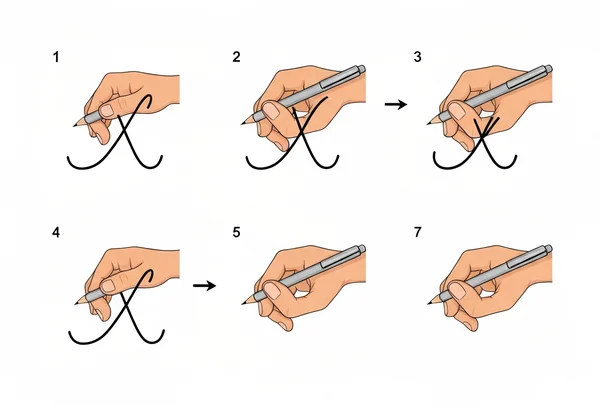
The lowercase cursive 'x' is an oddity because it often requires you to lift your pen. This break in flow can be tricky, but once mastered, it adds a sharp and distinct character to your writing.
How to Form the Lowercase Cursive 'X'
The cursive 'x' is best thought of as two separate but coordinated strokes.
-
The First Stroke: Start at the baseline and make an upward, curved stroke that looks like the first half of a lowercase 'n'. It should arch up to the midline and then come straight back down to the baseline. Keep your pen on the paper.
-
Lift and Cross: Now, lift your pen. Move it to the top left, near the midline, and draw a straight or slightly curved line that crosses through the middle of your first stroke.
Why Cursive 'X' Can Be Tricky and How to Fix It
The main challenge is the pen lift. It breaks the rhythm of cursive writing.
- Misaligned Cross: The second stroke often crosses too high, too low, or at the wrong angle.
- Solution: Aim for the dead center of the first stroke. Think of it as crossing a 't', but diagonally.
- Poor Connections: Connecting to the letter after 'x' can feel awkward.
- Solution: Modern cursive often allows the second crossing stroke to finish with a small upward flick, which serves as the connector. Practice connecting 'x' to common letters like 'e' and 'i'.
Practice Your Cursive 'X'
Because it's so different, the cursive 'x' requires focused practice. Repetition helps you judge the pen lift and cross-stroke placement automatically. Get your free cursive 'x' worksheet to build confidence and consistency.
Your Guide to Perfecting Cursive 'Y' with Worksheets & Drills
The cursive 'y' is another letter with a descending loop, similar to 'g'. However, its entry stroke and the shape of its loop are slightly different, giving it a more open and flowing appearance.
Forming a Beautiful Cursive 'Y'
The cursive 'y' is like combining a 'u' with the loop of a 'g'.
- The 'U' Shape Entry: Start at the baseline and form the first part of a cursive 'u'. Sweep up to the midline, curve down to the baseline, and then sweep back up to the midline again.
- The Descending Loop: From the midline, trace straight down, going below the baseline to create the descending loop.
- Cross and Connect: As with the 'g', loop back to the left, cross the downward stroke at the baseline, and finish with an exit stroke ready to connect.
![Step-by-step guide for writing l)
Common 'Y' Mistakes to Avoid
- Mistake 1: Starting Like an 'I'. Some writers start with a straight upstroke instead of the curved 'u' entry. This makes the letter look stiff.
- Solution: Always begin by thinking "u". That initial dip and curve are essential to the letter's form.
- Mistake 2: A Closed Top. The 'u' part is closed, making the letter look like a 'g' with a strange entry.
- Solution: Ensure there is a visible valley in the 'u' shape at the top before you begin your descent.
Practice Tools for the Cursive 'Y'
Drilling the cursive 'y' helps distinguish its unique form from other looped letters. Use our online practice tools to trace the letter and practice writing it in words. This interactive feedback helps correct mistakes in real-time.
General Tips for Tackling Tricky Lowercase Cursive Letters
Mastering individual letters is the first step. These overarching tips will help you integrate them smoothly into your overall handwriting.
The Power of Consistent, Mindful Practice
You don't need to practice for hours. Just 10-15 minutes of focused, mindful practice each day is more effective than a single long session once a week. This consistency builds muscle memory, which is the key to fluid, automatic handwriting.
Optimizing Your Pen Grip and Posture for Better Flow
How you sit and hold your pen has a huge impact on your writing.
- Posture: Sit up straight with your feet flat on the floor. Don't hunch over your desk.
- Pen Grip: Grip the pen lightly: thumb and index finger on top, middle finger below. Skip the tight squeeze—it leads to fatigue and shaky lines.
- Use Your Arm: Good cursive comes from the arm, not just the fingers. Try to move your entire forearm as you write, allowing for smoother, more connected strokes.
Using Free Cursive Worksheets and Tools for Continuous Improvement
Learning cursive is a journey, and having the right resources makes all the difference. Our website is a comprehensive hub designed to support learners of all ages.
- A-to-Z Worksheets: Find printable worksheets for every single letter, both uppercase and lowercase.
- Interactive Generator: Have fun with our Cursive Font Generator. Type in any text and see it instantly transformed into beautiful script. It's a great way to study letter connections.
- Quizzes: Test your knowledge and track your progress with fun, interactive quizzes.
Ready to improve? Explore all resources and start your journey to beautiful handwriting today.
Your Journey to Cursive Fluency Starts Now!
Conquering tricky lowercase cursive letters like 'g', 'q', 'x', and 'y' is not about talent; it's about understanding the mechanics and committing to practice. By breaking each letter down into simple strokes, recognizing common mistakes, and using effective practice materials, you can transform these points of frustration into sources of pride.
Remember, every expert was once a beginner. Be patient with yourself, celebrate small victories, and use the tools available to you. Your journey to fluent, elegant cursive handwriting is well underway.
Visit our site now to download your free practice worksheets, try our font generator, and access all the resources you need to succeed. Happy writing!
Frequently Asked Questions About Tricky Lowercase Cursive Letters
Why are certain lowercase cursive letters like G, Q, X, Y considered tricky?
These letters are tricky because they break simple patterns. For example, 'g', 'q', and 'y' drop loops below the baseline, which demands extra spatial awareness. The letter 'x' is unique because it needs a pen lift, which can halt your writing flow.
What is the best way to practice tricky cursive letters effectively?
The best way is through focused, consistent repetition. Start by tracing the correct letter form on a worksheet to build muscle memory. Then, practice writing the letter on its own, focusing on smooth strokes. Finally, write it in simple words to master the connections. Short, daily practice sessions are more effective than infrequent, long ones.
How can our free cursive alphabet resources help you master all lowercase cursive letters?
Our website is a complete resource hub for cursive learners. We offer free, printable worksheets for every letter from A to Z, providing step-by-step stroke guidance. Our interactive tools allow you to see how letters connect, and our Cursive Font Generator can inspire you by showing any word in perfect script. It's the ideal place to master all letters for free.
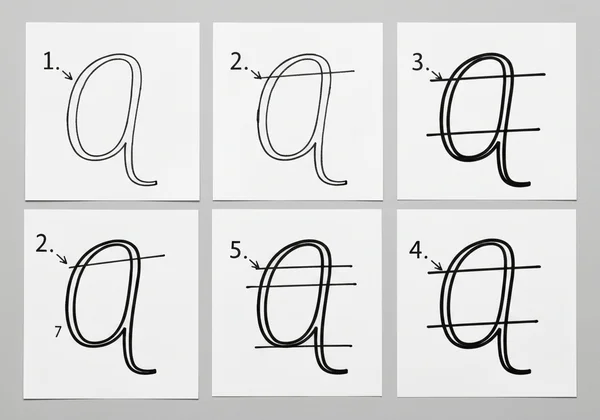
Are there specific stroke orders for lowercase cursive G, Q, X, Y?
Yes, absolutely. Following the correct stroke order is crucial for creating legible and fluid cursive. For example, the oval of the 'g' and 'q' must be completed before the descending tail. Our guides and printable cursive worksheets clearly demonstrate the correct, step-by-step stroke order for each of these tricky letters to ensure you build good habits from the start.