Mastering Cursive Letter Connections for Smooth Handwriting
Do you ever look at a piece of beautiful cursive writing and wonder why yours looks a bit "choppy"? You might know how to write every letter from A to Z, but putting them together feels like a struggle. Why does your handwriting stop and start instead of flowing like a ribbon? The secret to beautiful penmanship isn't just in the letters themselves, but in the cursive letter connections that bridge them together.
Learning to connect letters properly is the turning point for any student or hobbyist. It transforms individual characters into a rhythmic, flowing dance across the page. Let's explore how these connections work and how you can achieve that smooth, flowing handwriting you've always wanted. To get started with guided practice, you can try our free tool which provides interactive worksheets for every letter.
This guide will help you understand the "anatomy" of a connection, master tricky letter pairs, and develop a consistent writing rhythm that makes your handwriting flow naturally. Whether you are a student trying to finish homework faster or an artist looking to improve your signature, mastering these links is your first step toward success.
Understanding the Foundation of Cursive Connections
Cursive writing was designed for speed and efficiency. Unlike print writing, where you lift your pen after every letter, cursive keeps the pen on the paper. This creates a continuous line. Understanding the foundation of these connections means looking at where one letter ends and the next begins.
Every cursive letter has a specific "exit point." Most letters end at the bottom baseline, while others end at the middle "waistline." Knowing where these exits are is half the battle. If you exit a letter at the wrong height, you will find it nearly impossible to join it to the next one without a clunky, awkward gap. To see these exit points clearly, you can use our cursive font generator to type out words and watch how the letters link up.
Anatomy of a Perfect Cursive Connection
Every cursive connection has three key components: the exit stroke, the bridge, and the entry stroke. The exit stroke forms the tail of the first letter. The entry stroke marks the beginning of the second letter. The "bridge" is the space where they connect.
Most connections happen in one of two ways:
- Bottom Connections: These occur when a letter ends at the baseline (like 'a', 'c', or 'd') and connects to another letter that starts at the baseline. The pen moves in a natural upward curve.
- Top Connections (Bridges): These happen when a letter ends at the middle line (like 'b', 'o', 'v', or 'w'). These are often harder because the "bridge" stays high, meaning the next letter must start from the middle rather than the bottom.
Mastering these two types of movements is essential for smooth handwriting flow. When you visualize the connection as a bridge rather than a stop sign, your hand begins to move more fluidly.
Common Mistakes That Break Your Handwriting Flow
Even experienced writers sometimes make mistakes that cause their cursive to look messy. One of the most common issues is "pen lifting." If you lift your pen in the middle of a word, you break the momentum. This often happens because the writer is unsure of how to reach the next letter.
Another common mistake involves challenging cursive combinations where the slant of the letters changes. If your first letter slants to the right and your second letter is vertical, the connection will look pinched. Inconsistent spacing is also a major culprit. If your connections are too long, the word looks stretched out. If they are too short, the letters crash into each other. You can find free cursive worksheets on our site that help you practice the exact distance needed between letters.
Mastering Difficult Letter Pairs and Combinations
Once you understand the basic mechanics, it is time to face the "troublemakers." Not all letters are created equal in the world of cursive. Some letters have unique shapes that make them difficult to link. If you have ever struggled with the letter 'r' or 's', you are not alone. These are often the biggest hurdles for beginners.
The key to mastering challenging cursive combinations is slow, deliberate practice. You have to train your hand to remember the specific path it needs to take. Instead of rushing through a sentence, focus on just two letters at a time. This builds the muscle memory required for long-term improvement.
Conquering the Tricky 'r' and 's' Connections
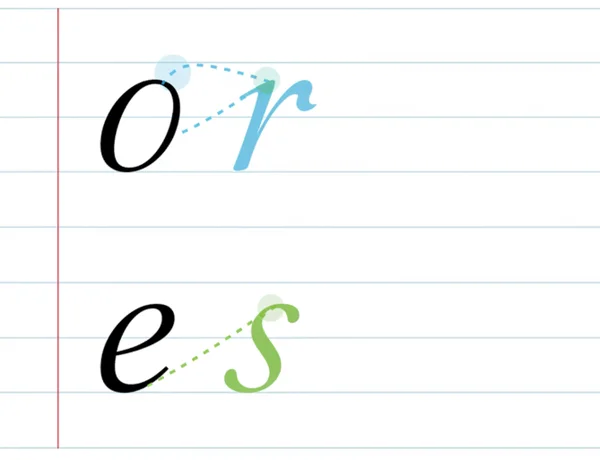
The letters 'r' and 's' are unique because they don't follow the standard "oval" or "loop" shape of letters like 'a' or 'l'. A cursive 'r' requires a small "step" at the top before it moves down. If you don't make that step, it ends up looking like an 'i' or a 'u'.
When connecting an 'o' to an 'r', the connection stays at the top. The 'r' doesn't start at the bottom baseline as it normally would. The letter 's' also has specific requirements—its "belly" must be closed properly before moving to the next letter. If you are struggling to visualize this, check our cursive font generator to see how these tricky letters look in different word combinations.
Navigating Ascenders and Descenders in Connected Writing
Ascenders are parts of letters that go up (like 'b', 'd', 'h', 'k', 'l'). Descenders are parts that go down below the line (like 'g', 'j', 'p', 'q', 'y'). Connecting these can be physically demanding for your hand because of the large vertical movements.
This presents a unique challenge to your writing rhythm. Moving from a descender like 'g' to an ascender like 'l' requires your pen to travel a significant distance. The secret is to keep your grip light. If you press too hard, your hand will tire out, and the connection will look shaky. Focus on making the transition smooth and rounded. Practice these specific movements by downloading our alphabet in cursive guides, which highlight the path for every high and low stroke.
Developing Your Cursive Writing Rhythm and Flow
Cursive is often compared to music. Just as music has a beat, writing has a rhythm. This rhythm comes from the consistent timing of your upstrokes and downstrokes. When you find your flow, the pen seems to glide on its own.
Developing this rhythm takes time, but it is the difference between "writing" and "calligraphy." It’s about more than just being legible; it’s about being effortless. To improve your word connections in cursive, you should practice "nonsense strings"—long chains of the same connection repeated over and over until it feels natural.
Exercises for Building Smooth Transitions Between Letters
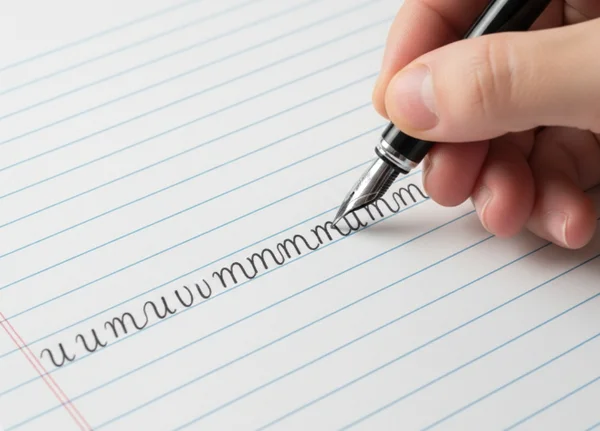
To build better transitions, try the "Wave Exercise." Draw a continuous line of "u" shapes without stopping. Then, try a line of "m" shapes. Finally, try "um-um-um" strings. This teaches your hand how to switch between bottom-entry and top-entry letters without losing speed.
Another great exercise is the "Minimum" drill. The word "minimum" in cursive is famous for being a series of similar-looking humps. Writing it correctly requires perfect control over your cursive writing rhythm. If you can write "minimum" clearly and quickly, you have mastered the most common connection types. For more guided exercises like this, check out our interactive learning modules.
Practice Drills for Consistent Letter Spacing
Spacing is the "breath" of your writing. If your letters are too crowded, they can't breathe, and the reader can't see the connections. If they are too far apart, the word falls apart.
To practice spacing, use lined paper with vertical slants if possible. Your goal is to make the "bridge" between every letter exactly the same width. A good rule of thumb is that the space between letters should be about the width of the letter 'o'. You can generate custom practice sheets with specific spacing using our online cursive tool to help guide your hand until the spacing becomes automatic.
Your Path to Effortlessly Flowing Cursive Handwriting
Mastering smooth cursive connections takes time and practice, but the results are worth every stroke. By understanding the anatomy of a stroke, tackling the difficult pairs like 'r' and 's', and focusing on your writing rhythm, you can transform your penmanship from messy to magnificent. Remember that the "bridge" between letters is just as important as the letters themselves.
The most important thing is to keep practicing. Even ten minutes a day can make a massive difference in your smooth handwriting flow. Don't be afraid to slow down and focus on the tiny details of how your pen moves from the baseline to the waistline.
Are you ready to take your handwriting to the next level? We have everything you need to succeed. From printable charts to interactive tools, you can start practicing now and see your progress in real-time. Beautiful, flowing cursive is just a few connections away!
The Takeaway
How long does it take to master smooth cursive connections?
Mastering connections depends on your starting point, but most people see a significant improvement within 2 to 4 weeks of daily practice. The key is consistency rather than long hours. Practicing for 15 minutes every day is much more effective than practicing for two hours once a week. You can use our alphabet chart to keep your practice sessions focused and organized.
What is the best way to practice difficult letter combinations?
The best way is to isolate the two letters you struggle with. If 'br' is hard for you, write 'br' fifty times. Focus on the height of the bridge and the shape of the 'r'. Once it feels comfortable, put it into a word like "bridge" or "brown." Breaking the problem down into smaller parts makes it much less overwhelming.
How can I tell if my cursive connections are correct?
Look at the "white space" between your letters. In well-connected cursive, the gaps between letters should look uniform. If one gap is very wide and the next is very narrow, your connections need work. Additionally, check if your letters are leaning at the same angle. If you need a reference, our cursive font generator can show you exactly how a perfect connection should look.
Why do some of my cursive letters not connect properly?
This usually happens for one of two reasons: either you are lifting your pen too early, or you are ending the previous letter at the wrong height. Many beginners forget that letters like 'o', 'b', and 'v' end at the middle line, not the bottom. If you try to bring those letters down to the baseline to connect, the writing will look distorted. Always check the how to write the alphabet in cursive guide on our homepage to verify the exit points for every letter.