DIY Cursive Alphabet Invitation Design: Your Step-by-Step Project
Crafting a beautiful invitation for a wedding, party, or special event doesn't have to be daunting or expensive. The elegance of the cursive alphabet can add a touch of sophistication and personal charm that sets your occasion apart. But how to use fonts based on the cursive letters alphabet effectively to create a professional-looking design from scratch? This guide will walk you through a simple yet stunning DIY cursive invitation project, showing you how to harness the timeless beauty of the full cursive writing alphabet for your special moments using the free tools available right here on our website.
This guide makes it simple. We'll walk you through each step, empowering you to create invitations that look professionally made. With our guidance and powerful online resources, you'll see how easy it is to bring your vision to life. Start your project now and let's begin.
Planning Your Cursive Alphabet Design Project
Every great cursive alphabet design begins with a solid plan. Before you jump into fonts and layouts, taking a moment to organize your thoughts will make the entire process smoother and more enjoyable. This foundational step ensures your final invitation is not only beautiful but also perfectly communicates the essential details of your event. A well-planned project saves time and prevents creative roadblocks later on.
What Makes a Great DIY Cursive Alphabet Invitation Stand Out?
A truly great DIY invitation is a perfect blend of personality, clarity, and style. It’s more than just a piece of paper; it's the first impression guests will have of your event. The key is to balance the artistic flair of cursive with practical readability. Your design should reflect the tone of the occasion—be it a formal wedding, a casual birthday bash, or a chic corporate gathering. Pay attention to details like paper quality, color schemes, and consistent branding to create a cohesive and memorable piece.
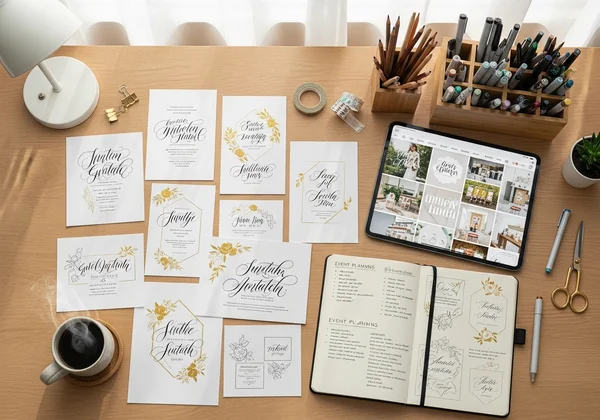
Gathering Inspiration & Key Details for Your Design
Finding invitation inspiration is the most exciting part of the planning phase. Browse platforms like Pinterest or design blogs to see what catches your eye. Are you drawn to minimalist designs with a single, elegant header using a beautiful alphabet in cursive, or do you prefer more ornate layouts? Once you have a vision, gather all the critical information: the event name, date, time, location, RSVP details, and any dress code. Having this text ready will make the next steps much easier and ensure nothing important is left out.
Crafting Your Cursive Alphabet Text with Our Font Generator
This is where the magic happens. Transforming your plain text into beautiful, flowing script based on the complete cursive alphabet is the heart of your project. Instead of spending hours searching for and installing fonts, a powerful online tool can do the heavy lifting for you. Our Cursive Font Generator is designed for exactly this purpose, providing you with elegant text that you can copy and paste directly into your design.
How to Generate Your Perfect Cursive Text Instantly
Ready to generate cursive text? It's incredibly simple. Just navigate to our website's homepage and find the Cursive Font Generator. Type or paste your event details—like the names of the honorees or the title of the event—into the text box. Instantly, the tool will convert your words into a variety of beautiful cursive styles. You can experiment with different phrases until you find the perfect look that matches your vision. This intuitive process puts the power of typography at your fingertips.
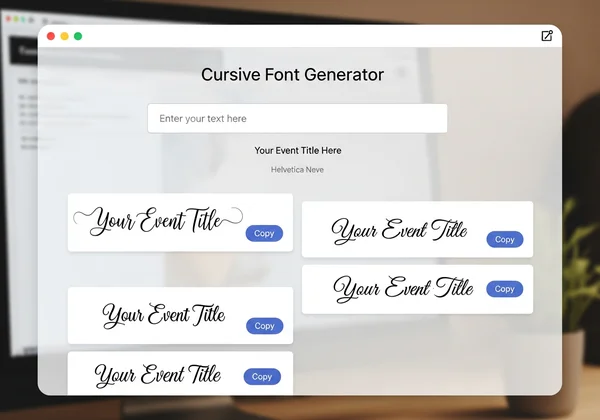
Copying & Customizing Your Cursive Output
Once you've generated the perfect script, the next step is to customize cursive text within your design software. Simply click the "copy" button next to your generated text. Then, open your preferred design program, whether it's Microsoft Word, Google Docs, Canva, or Adobe Illustrator. Paste the cursive text as a new text element. From there, you can adjust its size, color, and position to fit seamlessly into your overall layout. This flexibility allows you to integrate stunning cursive elements without any technical hassle.
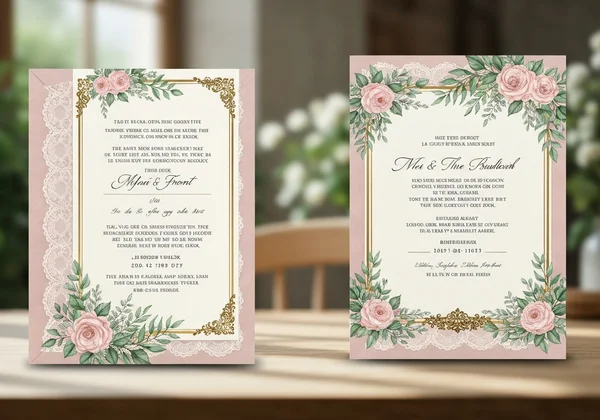
Assembling Your Cursive Alphabet Invitation Design
With your cursive text generated and your basic plan in place, it’s time to bring all the elements together into a cohesive cursive alphabet invitation design. This stage is all about arranging your text and any graphical elements to create a balanced and visually appealing layout. Proper assembly ensures your invitation is not just pretty but also easy to read and understand.
Pairing Cursive Fonts for Readability & Style
One of the most important font pairing tips is to combine your decorative cursive font with a simple, clean font. Use the elegant script, which showcases the beauty of the cursive alphabet, for headings, names, or key phrases to make them stand out. For the body text, which includes details like the date, time, and address, choose a classic serif or sans-serif font. This contrast ensures that while your invitation is stylish, the essential information remains clear and legible for all your guests.
Layout Essentials for a Stunning Cursive Invite
Effective layout ideas are built on principles of hierarchy and balance. Place the most important information, like the event title or the names, at the top or in the center, using your generated cursive text to draw the eye. Arrange the supporting details in a logical order below. Don't be afraid of white space—giving your text and design elements room to breathe creates a more elegant and uncluttered look. A well-structured layout guides the reader's eye naturally through the invitation.
Printing & Finishing Your Cursive Alphabet Masterpiece
The final step is to bring your digital design to life. Printing your cursive alphabet masterpiece correctly and adding those final personal touches will elevate your DIY invitation from good to unforgettable. This is your chance to add a tactile, personal element that guests will truly appreciate.
Best Practices for Printing Cursive Designs at Home
For successful home printing, a few best practices can make all the difference. First, choose a high-quality cardstock that feels substantial and looks professional. Before printing your entire batch, always run a single test print to check for color accuracy and alignment issues. Ensure your printer is set to its highest quality setting. Delicate cursive fonts, especially those from a detailed cursive alphabet chart, show up best with crisp, clean printing, so a well-maintained printer and quality paper are your best allies.
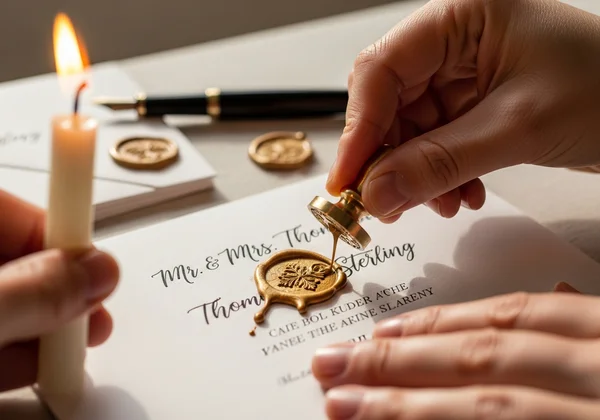
Adding Personal Touches & Embellishments
To make your invitations truly unique, consider adding some invitation embellishments. A simple ribbon tied around the card, a classic wax seal on the envelope, or a touch of metallic ink can add a luxurious feel. You could even hand-write each guest's name on the envelope using the skills you've learned from our practice worksheets. These small, personal touches show your care and effort, making your invitation a cherished keepsake for your guests.
Your Beautiful Cursive Alphabet Invitation Awaits!
You've transformed your vision into reality! With these steps, you've mastered creating a stunning DIY invitation using the cursive alphabet. It proves how simple it is to elevate plain text into elegant art with the right tools. This process is entirely yours to customize. Ready to explore further? Visit our Cursive Font Generator and begin crafting your next project. Whether you're a seasoned designer or a complete beginner, our free resources are here to help you every step of the way.
Frequently Asked Questions About Cursive Alphabet Design Projects
Can I use the Cursive Font Generator for commercial projects like invitations?
Absolutely! Our free Cursive Font Generator is a versatile tool perfect for both personal and small commercial projects, such as designing invitations for clients, creating logos, or crafting social media posts. It's designed to give everyone access to beautiful typography.
What are some common mistakes to avoid when designing cursive invitations?
The most common mistake is overusing cursive fonts, which can make the invitation difficult to read. Another pitfall is choosing a cursive alphabet style that is too ornate for smaller text sizes. Always pair your script with a simple font for body text and ensure there is enough contrast between your text and background colors for maximum legibility.
How can I practice my handwriting to enhance my design project?
If you want to add a truly personal, handwritten touch to your invitations or envelopes, practice is key. Our website offers a comprehensive collection of free, printable cursive alphabet worksheets. Start by tracing letters and then move on to writing full words and sentences. Consistent practice will build your confidence and skill, allowing you to create beautiful handwritten elements for your project. Explore our resources to begin.
Where can I find more inspiration for unique cursive design projects?
Inspiration is everywhere! Beyond invitations, you can use cursive for creating personalized stationery, wall art, journal covers, or custom gift tags. Websites like Pinterest and Behance are excellent for visual ideas, and our own blog here at Cursive Alphabet regularly features creative ways to use our tools for all kinds of exciting projects.