Conquering Tricky Cursive Letters: K, Z, P, and B
You're making great progress with your cursive handwriting practice, but suddenly you hit a wall. The letters k, z, p, and b can feel like stumbling blocks, disrupting your flow and making you question your skills. Don't worry, you're not alone! These are universally recognized as some of the most tricky cursive letters. What are the hardest cursive letters? For many, it's this exact group. This guide is here to troubleshoot these difficult cursive letters, breaking them down into simple, manageable steps so you can conquer them with confidence. For focused exercises, you can always explore our targeted cursive practice drills.
A Step-by-Step Guide to Mastering Difficult Cursive Letters
The key to mastering these letters is to understand their unique structure and practice each component deliberately. We'll provide a clear, step-by-step cursive letter formation guide for each one, point out common cursive mistakes, and show you how to perfect your technique for more legible cursive.
Why Some Cursive Letters Are Tricker Than Others
Why are some cursive letters so hard? It usually comes down to a few key reasons.
Unusual Starting Points or Direction Changes
Some letters, like the cursive k, require you to retrace or change direction in a way that feels unnatural at first.
Complex Loops or Non-Intuitive Connections
Letters with multiple loops or unusual letter connections, like the cursive b, can be challenging to master while maintaining a smooth, consistent flow.
Big Differences from Their Print Counterparts
The cursive z is a classic example of a letter that looks very different from its printed version, requiring you to learn a completely new shape.
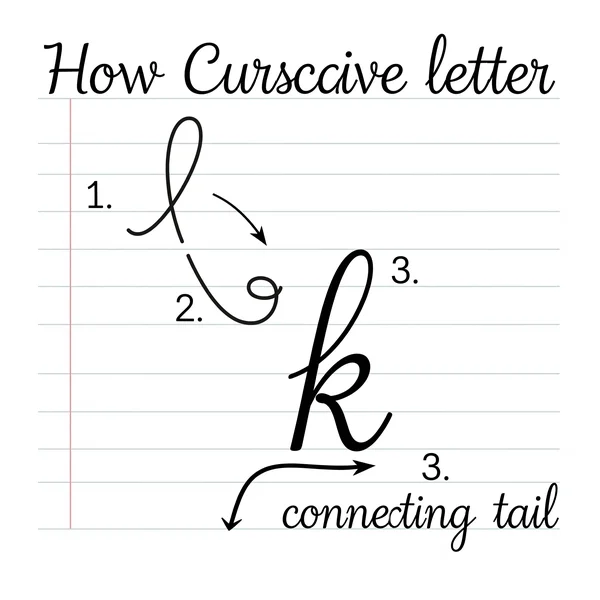
How to Write K Cursive: The Loop and the Kick
The cursive k often stumps learners. How to write k in cursive? Let's break it down.
Step 1: The Initial Ascending Loop
Begin just like you would for a cursive 'l' or 'h'. Start at the baseline, sweep up to the top line to form a loop, and then bring a straight downstroke back to the baseline.
Step 2: The Small Inner Loop or "Bubble"
Without lifting your pen, retrace about halfway up the straight downstroke. Now, move to the right to form a small, open loop or "bubble." This is the part that distinguishes the cursive k.
Step 3: The Final Downstroke and Connecting Tail
From the bottom of that small inner loop, sweep a diagonal line down to the baseline and finish with an up-curving tail to connect to the next letter.
Common Cursive Mistakes: Making the inner loop too big or too small.
A common error is making the inner "bubble" too large, which can make it look like an 'h', or so small it closes up. Aim for a small, clear, open loop. Why is cursive k so weird? It’s this unique inner loop that often feels strange, but it's essential for correct cursive letter formation.
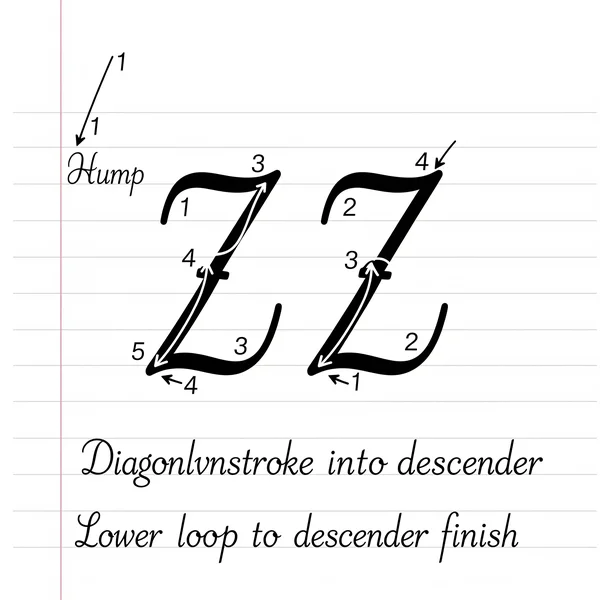
How to Write Z Cursive: Mastering the Descender Loop
The cursive z looks nothing like its print version, but it's quite fun once you master it. How to write z in cursive?
Step 1: The First Hump
Start at the baseline with an upstroke, similar to the start of a cursive 'n' or 'm'. Form a small, rounded hump.
Step 2: The Diagonal Downstroke and Descender
From the end of that hump, draw a diagonal line down and to the left, extending below the baseline to create the descender.
Step 3: Forming the Lower Loop and Crossing Over
Create a loop below the baseline by sweeping to the left and then up and to the right, crossing over your diagonal downstroke at the baseline. Finish with a tail to connect to the next letter.
Common Cursive Mistakes: Making the loop go the wrong way.
Ensure the descender loop is formed to the left before crossing over. A loop to the right can be confused with other letters.
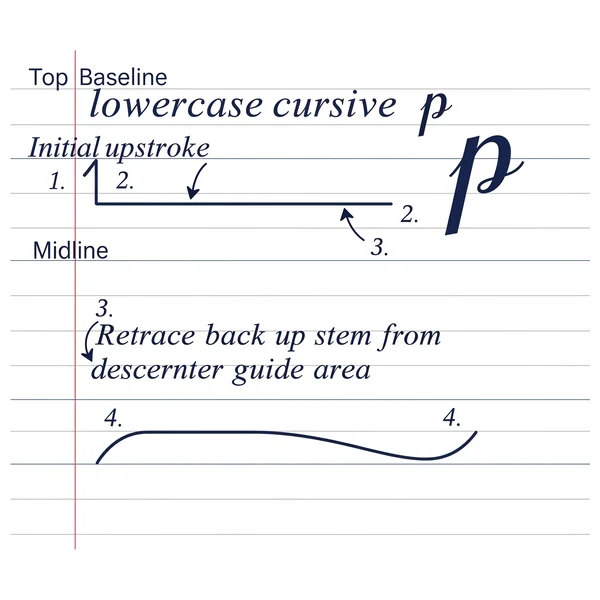
How to Write P Cursive: The Long Stem and the Curve
The cursive p is a tall letter with a distinct shape. How to write p in cursive?
Step 1: The Initial Upstroke and Long Descending Stem
Start at the baseline with a sharp upstroke that goes to the top line. Then, reverse direction and draw a straight stem that goes all the way down below the baseline (similar in length to the descender on a 'g').
Step 2: Retracing Upwards
Without lifting your pen, trace back up along the same stem until you reach the baseline again.
Step 3: Forming the Forward-Facing Curve
From the baseline, sweep up and to the right to form a rounded, forward-facing curve that connects back to the main stem, usually around the midline. Finish with a connecting stroke.
Common Cursive Mistakes: Not retracing the stem correctly.
A common issue is not tracing back up the stem perfectly, creating a messy or doubled line. Slow practice can help fix this.
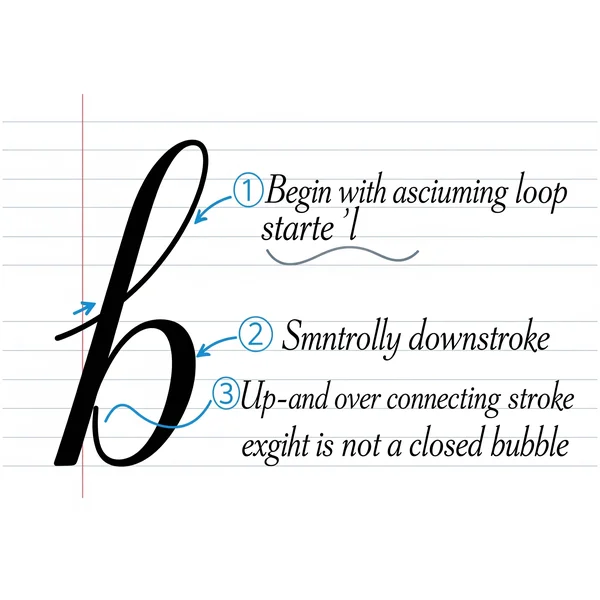
How to Write B Cursive: The Upstroke and the Final Connection
The cursive b looks like a cursive 'l' with a unique ending. How to write b in cursive?
Step 1: The Ascending Loop (like a cursive 'l')
Start at the baseline and create an ascending loop that reaches the top line, then bring a straight downstroke back to the baseline, just like a cursive 'l'.
Step 2: The Downstroke to the Baseline
Ensure this downstroke is straight and rests firmly on the baseline.
Step 3: The Final Up-and-Over Connecting Stroke
From the baseline, without lifting your pen, curve up and to the right, almost like a small wave or checkmark. This is the connecting stroke that improving cursive flow depends on. It should not look like the bottom half of a print 'B'.
Common Cursive Mistakes: The final stroke not being a clear connector.
Many learners try to make a bubble at the bottom. The final stroke of a cursive b is an exit stroke, not a closed shape.
Universal Strategies for Any Difficult Cursive Letter
How to practice tricky cursive letters? These strategies work for any letter that gives you trouble.
Break It Down: Analyze the Basic Strokes
Every letter is just a combination of basic strokes (upstrokes, downstrokes, ovals, loops). Isolate the part that's giving you trouble and practice just that stroke.
Go Slow: Practice in "Slow Motion"
Rushing leads to mistakes. Practice these difficult cursive letters very slowly, focusing on each movement. Accuracy will eventually build speed.
Cursive Practice Drills: Repetition Builds Muscle Memory
Dedicated cursive practice drills are essential. Write rows of the single tricky letter, then practice it in simple words. You can find worksheets for specific letters to help with this.
Compare Your Work to a Cursive Alphabet Chart
Constantly reference a reliable cursive alphabet chart to ensure you're practicing the correct form. Visual comparison is a powerful learning tool.
Practice and Patience Will Conquer All Tricky Letters
Facing tricky cursive letters is a normal part of learning. The key is not to get discouraged but to approach these challenges with a strategy. By breaking down each difficult cursive letter into its core components, practicing slowly and deliberately, and using targeted cursive practice drills, you will build the muscle memory and confidence to master them. Every letter in the cursive alphabet is achievable with patience.
What other cursive letters do you find tricky? Let us know in the comments below! We're always looking for new challenges to tackle. For more in-depth guides, feel free to browse our full learning resources.
Frequently Asked Questions About Tricky Cursive Letters
Let's clear up a few more common questions about these letters.
Why does the cursive 'k' (or 'z') look so different from the print version?
The forms of many cursive letters evolved for one primary reason: speed and flow. The shapes of the cursive k and cursive z were designed to be written in a continuous motion and to connect smoothly to the next letter, which required a different structure than the stop-and-start print versions.
Are there simpler, alternative forms for these difficult letters?
Yes, some modern cursive handwriting styles offer simplified versions of letters like 'k', 'z', and 'r'. These often prioritize legibility and ease of learning over traditional ornamentation. It's perfectly acceptable to adopt a simpler form if it works for you, and many online cursive alphabet guides show these variations.
How do I connect from a tricky letter like 'b' or 'p'?
The exit stroke is key. For a cursive b, the final "checkmark" stroke flows directly into the next letter. For a cursive p, the connecting stroke comes from the bottom of the forward-facing curve. Mastering these exit strokes is crucial for improving cursive flow.
What other letters do people often find difficult?
Besides the ones we covered, many people also struggle with the cursive 'r', 'f', and 'v'. Each has its own unique challenges, but they can all be conquered using the same strategies of breaking them down and practicing deliberately. You can find help for all these letters in our complete cursive alphabet tutorials.